HOW TO MERCHANDISE A WALL
When ever I tell someone I'm a Visual Merchandiser for Topshop and Topman I mainly get the nod of 'have no idea what that is but cool' which I don't blame anyone for because not even I knew really what that was till I started. It's a lot of tiring work, It's re-doing the same wall over and over again till its perfect and it's quite physically challenge at times (mostly because of the stairs in my store... THEY ARE A KILLER) but in the end it can be incredibly rewarding. I wanted to do a step by step blog post so people can really see how much effort goes into one tiny part of the store and a tiny part of my day and hope people will start to understand why at 7 o'clock I'm ready for bed. So here is how I merchandise a wall for Topshop.
7 AM

This is where my day starts.. bright and early and with a coffee in my hand. Seeing as we are now going into A/W 17 our store is under huge 'construction' in a way. Over the past few weeks we've been on late's and early's to prepare us for our model store sign off. What is a model store sign off I hear you say? WELL as the season changes so do our stores.... MASSIVELY. We get given packs which include 'girls' which are our trends throughout the store, The store layout (this year we have basically had to move the whole store around and that being across two floors is not easy I'll tell you that), a creative pack for painting and mannequins and just overall pointers on how they want us to merchandise each area of the store. For the past couple of weeks I have been given the girl 'stylist' and she is all about the monochrome, clean, edgy but cool style. A lot of people think its the 'office style' section AND IT IS NOT so my mission for the past few weeks is to make it look as cool as I can which is hard considering I've only really had old stock but we are finally getting a lot of intake in for the trend and it is starting to really come together all in time for our sign off next tuesday *gulps*.
RACKING UP
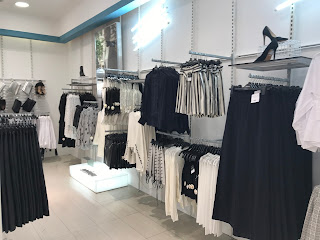
The first thing I have to do in order to re-merch the wall is to obviously strip it which actually takes a bit of time especially with a very large wall which thankfully I didn't really have (still big nevertheless) and while I strip I have to pick one of each product so I have them ready to place my ones. All the ones go on to my trusty silver rail and then I try to create outfits ready to put into the wall and I'm good to go. Usually you can change the arm configuration on the wall but until sign off we have to keep it to how it is in the pack but it did take a while to perfect the layout of this trend so I was happy to not have to deal with that. I also did the floor fixture which you can't see in these pictures.
PLACING YOUR ONES
So we finally get onto the exciting part.. placing. I start off with the floor fixtures because you need to make them stand out especially as stylist is right at the front of the store so it's even more essential to have something eye catching. In the pack they describe 'key outfits' which we have to try and achieve as best as possible and the day before my manager had racked up very kindly two key outfits for my trend which helped me out. I placed one on the floor fixture and one in the wall then it's all down to me. Topshop are going quite low density when it comes to merchandising so making it look sleek and clean is harder said then done when you have 1000 pieces of clothing on a wall that fits 200 at a push.


We have started to get in more textures so balancing that across the wall is essential along with pattern. Monochrome sounds super easy to work with but it's actually more difficult than working with colour if I do say so myself but the final outcome is very satisfying to look at. Also with it being at the front of the store I feel so much pressure to make it look as cool and enticing as I can considering I have absolutely no colour to draw you in. You have to think about what things are next to each other and if someone would wear them together. Then you have to balance out trousers and skirts with tops, coats and jumpers making sure a jumper isn't next to another jumper or if there is a top to go with that skirt and blazer. So much to consider but the biggest rule of merchandising is to not over think. Place your ones and then start to fill and if you don't like it then you can move it about after. Obviously only do this if you are happy with the majority of the wall because it will just take
you a million years to go back and do it all again.
8 am-FILLING IN AND ADJUSTING
It really starts to come together when you begin to fill in the wall and you can start to get a real idea of how it will end up looking like and this is where you can start to play around. You can see how much of one product you have and if it really does look right there. It's all about looking and adjusting what you have done to make it even more perfect. This is my favourite part of the whole process because it's very satisfying to see it all come together, see it all fill up and just to see the three large rails of clothes behind you turn into just one. The hard part comes next...
FRAGMENTATION
Once you have placed your wall and floor fixtures you have to then try and hide all of your frag and in our store WE HAVE A LOT. There are definitely trends that have so much frag your brain becomes frazzled after two minutes so luckily for me there wasn't that much however I have a smaller wall and a lot of product so that is where the issue comes in but alas I did it and only complained like 5 times.
9am- OUT POSTING AND FINISHING OFF
I actually managed to forget to take photos of the final walls BUT I'll still run you through what happens at 9 when the store opens and you should be pretty much done with all the filling in. Most of the time I'm still feeding in frag but after that I have to do the accessorising or as we call it 'out posting'. The shelves and the racking on the wall needed a refresh and so that is what I did. I ended up changing one of the shoes on the shelf as the boots had sold out, took the shoes off the racking on the wall and replaced them with three prongs across and two down instead of the four across and two done which neatened it up, Put a fashion waist belt (have no idea what they are called) on the racking along with a new bag and finally put some prongs on the t-arms with bags on throughout the trend. We also went on to add an accessory tree on the table next to the floor fixture to add some nice silver freedom pieces on.
So that is how I re-merch a wall and as you can see a lot of thinking, effort and time goes in to this but also I have time limits and guidelines to follow. After this I had to do a thousand other jobs (I know cry me a river) and when I got home I was ready for my loving bed. I'm actually really happy with how this came out because we have struggled for a couple of weeks with this trend and I feel like it really is getting there. I got some very positive feedback from it which makes all the hard work worth it even when the coffee hasn't kicked in and I'm ready to take a nap on the shop floor.
So from me to you MY JOB IS SO COOL. Have a lovely day.
Soph x


